
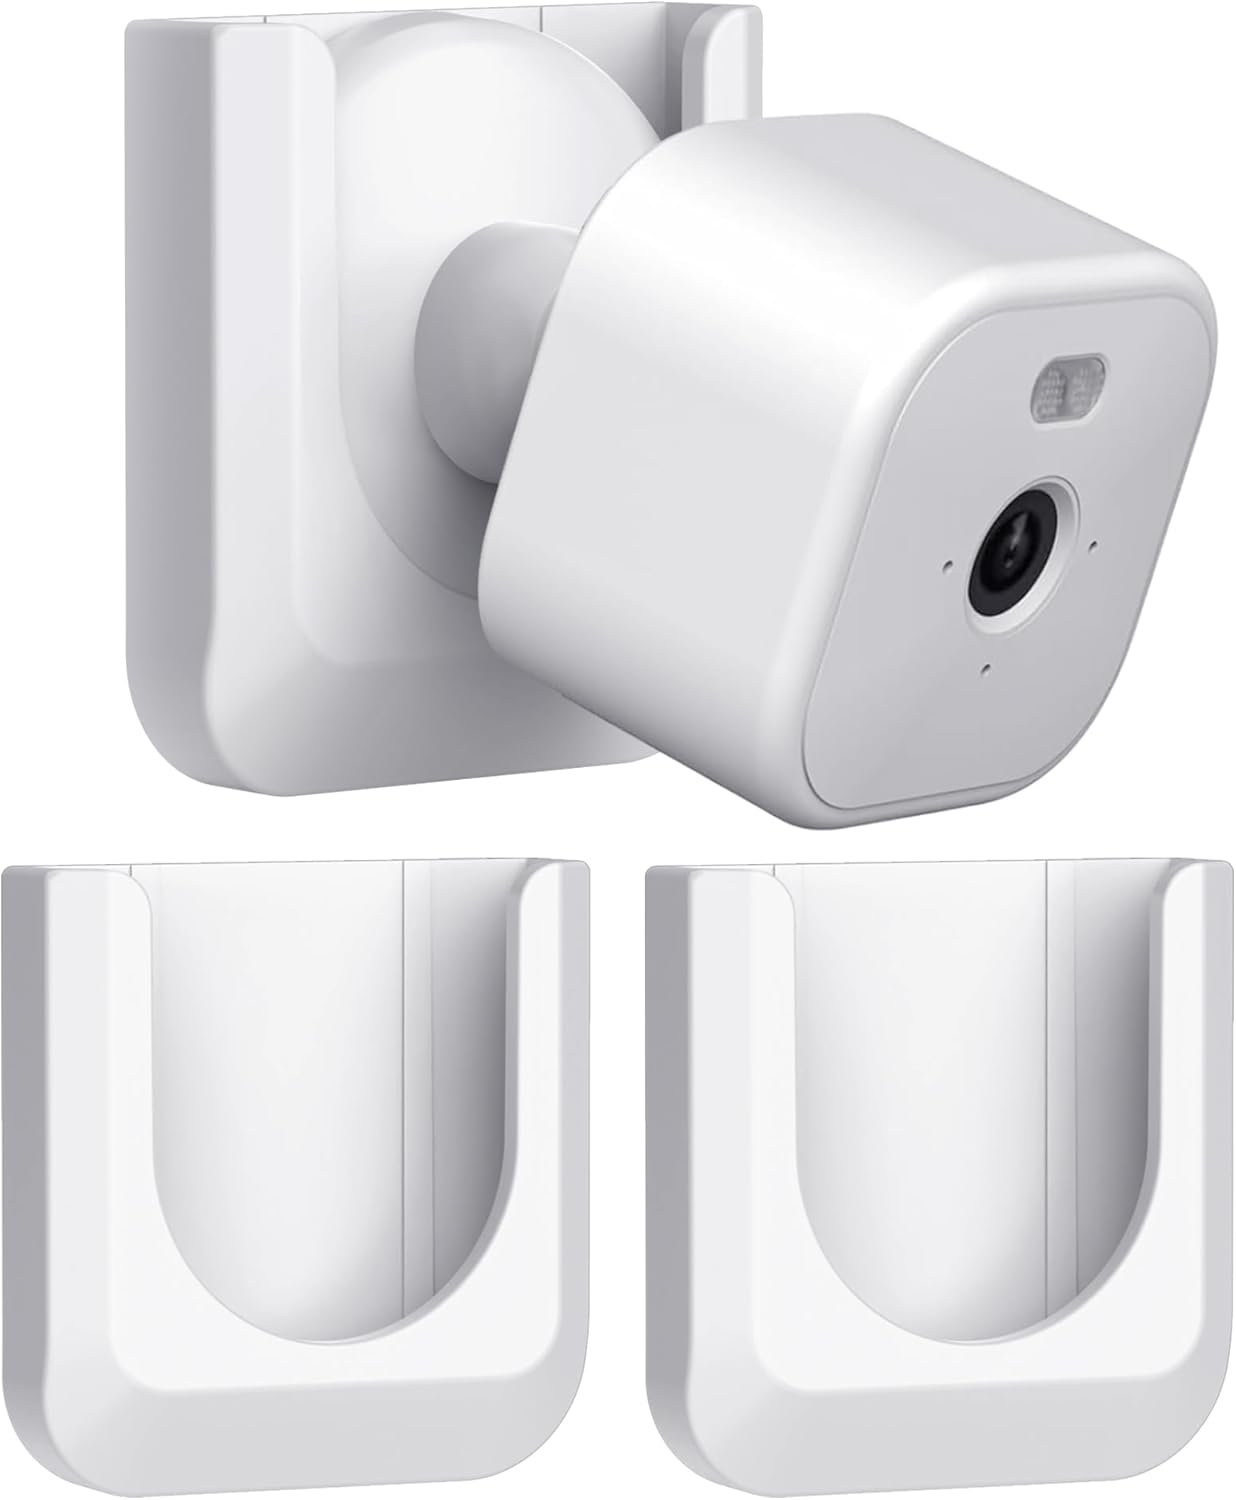
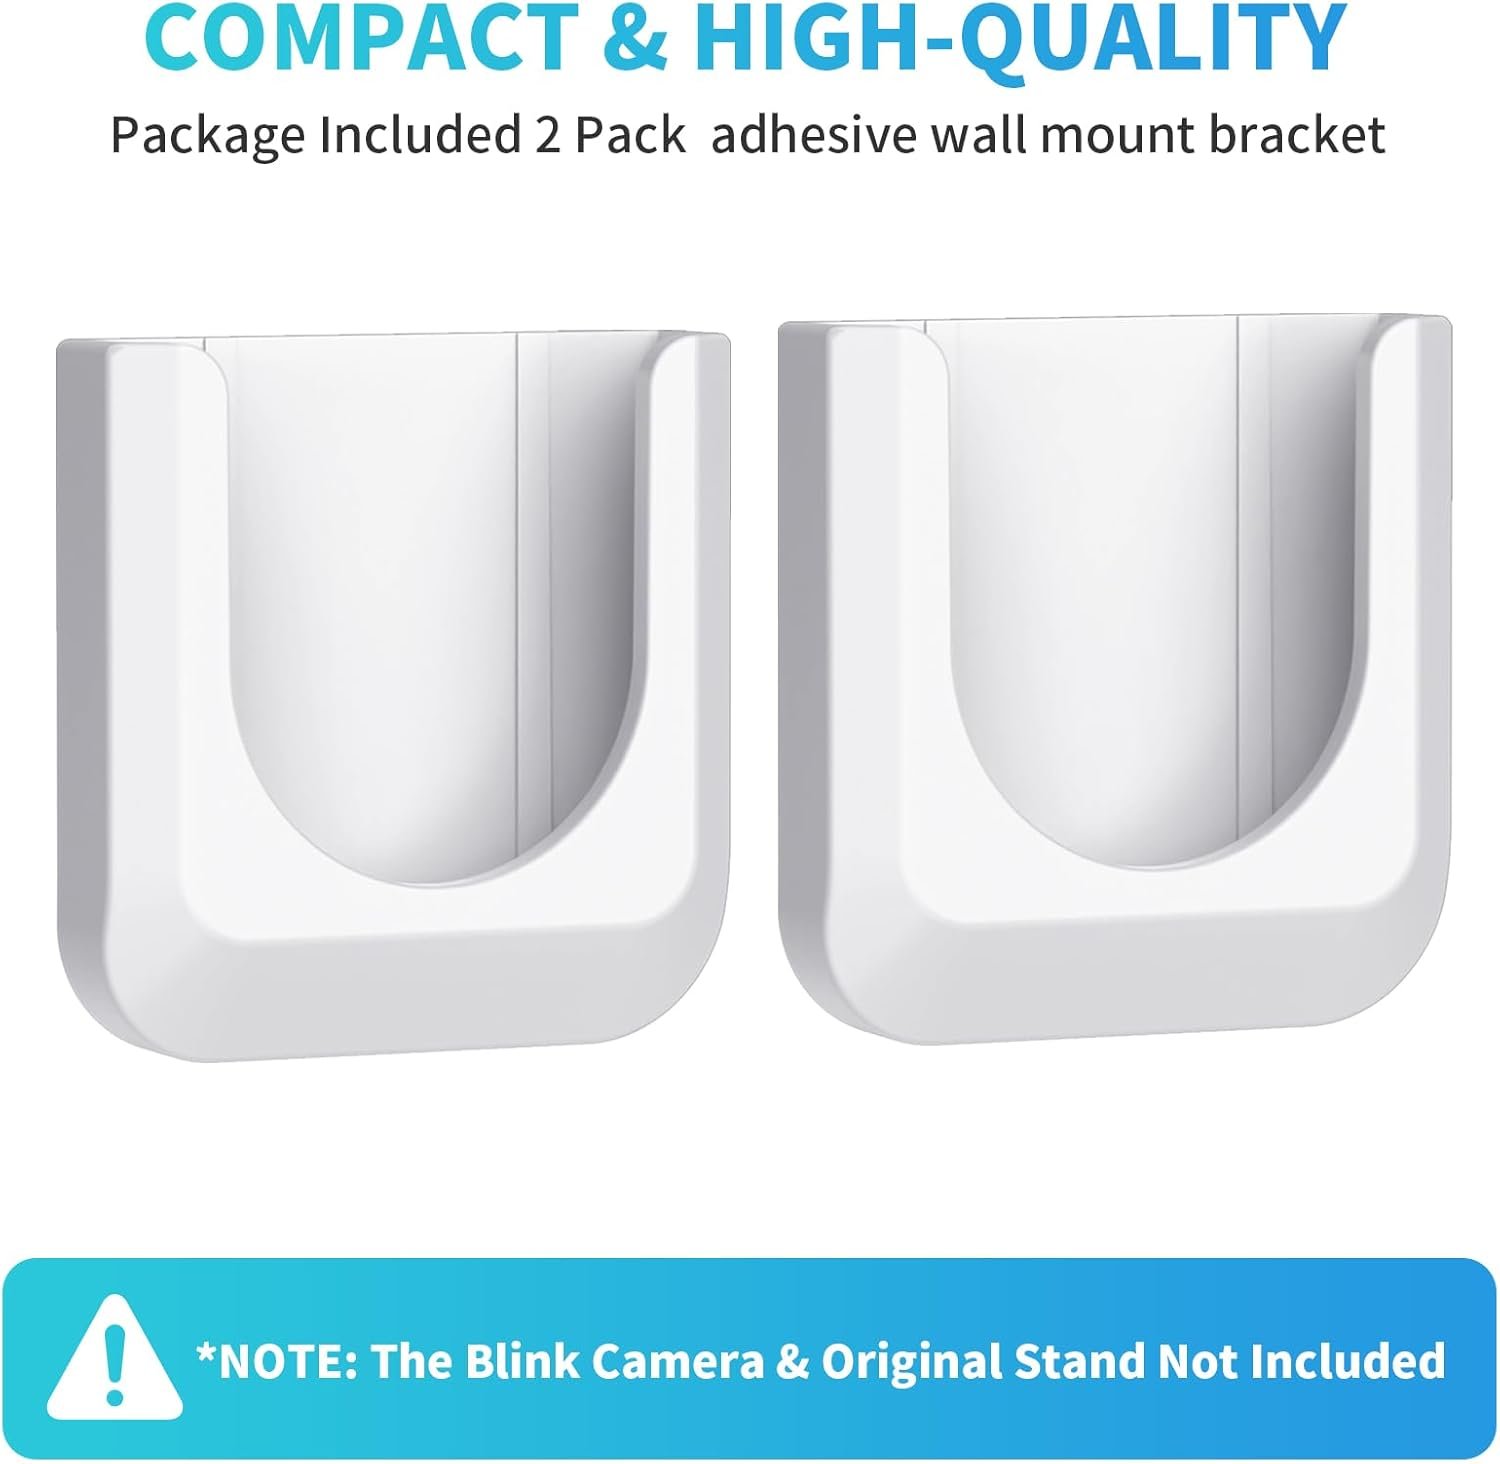


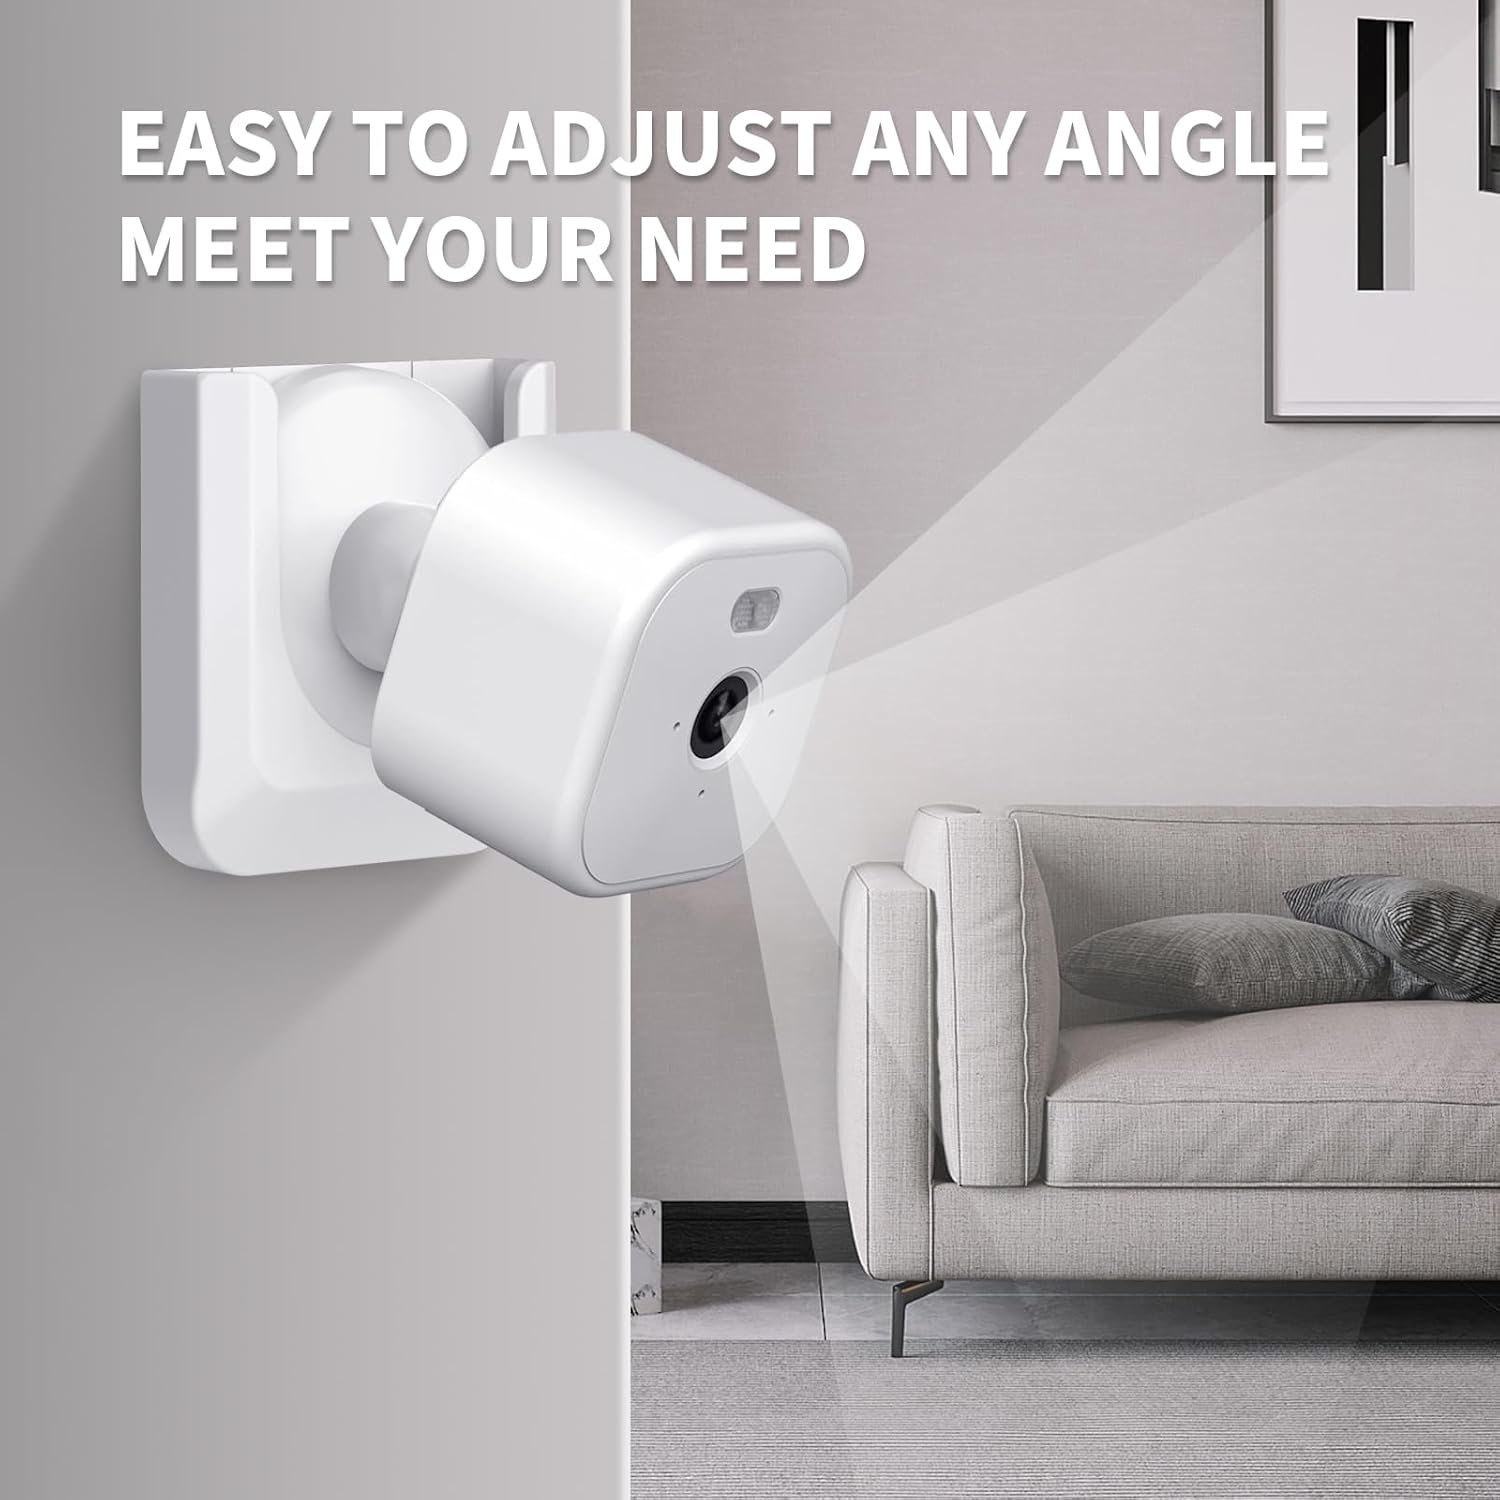

The Blink Mini 2 Camera Adhesive Wall Mount Bracket is a practical no-drill mounting solution designed for renters, apartment dwellers, homeowners who prefer damage-free installation, and anyone setting up Blink Mini 2 cameras without tools. This 2-pack of wall mount brackets uses industrial-strength VHB (Very High Bond) adhesive tape—the same mounting technology trusted in aerospace and automotive applications—to firmly secure your cameras to walls, ceilings, shelves, cabinet sides, and virtually any flat smooth surface. Each bracket features a 360° swivel adjustment mechanism that lets you precisely aim your camera to cover corners, doorways, hallways, or any target area without being limited by fixed mounting positions. The slide-in/snap-in camera slot grips the Blink Mini 2 securely while still allowing quick removal for battery swaps, repositioning, or temporary take-down—making it far more convenient than permanently screwed alternatives. Made from durable ABS plastic that resists humidity, temperature fluctuations, and daily wear, these brackets maintain a low-profile appearance that blends into home décor without drawing attention to your security setup. Perfect for renters who cannot drill into walls, parents monitoring nurseries and playrooms, pet owners watching feeding stations, or small business owners adding discreet surveillance in leased spaces—this mounting solution makes Blink Mini 2 setup genuinely effortless.
Blink Mini 2 mount uses 10-15 lb 3M adhesive eliminating drill holes, rental-friendly damage-free removal, 6-hour curing ensures secure hold, 2-pack saves $4 per mount, fits glass/tile/marble smooth surfaces.
It’s Monday morning, move-in day. Your landlord’s lease states “no holes in walls—$50 repair fee per hole”. You need security cameras covering bedroom, living room, and entryway—but traditional screw mounting would cost $150 in repair fees (3 cameras × $50). The dilemma forces choosing between security and losing your deposit.
Meanwhile, your Blink Mini 2 came with screw-mount hardware. “Mini 2 camera ships with camera mount along with two screws” requiring power drill, finding studs, measuring placement. The installation demands 15-20 minutes per camera plus tools—drill, screwdriver, level, stud finder. For three cameras, you’re spending an hour installing while risking crooked mounting and misaligned angles.
The Blink Mini 2 mount solves both problems through adhesive innovation and rental-friendly design. 10-15 lb 3M industrial adhesive provides permanent hold without drilling—”super strong adhesive tape can support up to 10-15lb, enough to support your blink mini camera weight” eliminating damage and deposit loss. The 30-second installation (peel backing, press mount, wait 6 hours, attach camera) replaces 15-20 minute screw mounting. The 2-pack pricing delivers $4-6 savings per mount versus singles—covering common 2-camera setups (front door + bedroom) affordably. Compatible with glass, tile, marble, and painted smooth surfaces, the damage-free removal uses hairdryer heat preventing paint damage when moving.
10-15 lb 3M Industrial Adhesive Eliminates Drill Holes and Repair Fees
Traditional screw mounting creates permanent damage. “Mini 2 camera ships with two screws” requiring drilling holes that “leave visible damage when removed”. Landlords charge “$50 repair fee per hole” for patching and repainting. Three cameras equal $150 repair costs at move-out.
The Blink Mini 2 mount implements heavy-duty adhesive engineering. “Super strong adhesive tape can support up to 10-15lb, enough to support your blink outdoor camera weight, never worry about falling off”. Professional specifications confirm: “Scotch-Mount Clear Double-Sided Mounting Tape holds up to 15 pounds with 3M industrial strength adhesive”. The 10-15 lb capacity exceeds Blink Mini 2 weight 20-30 times.
The adhesive technology proves sophisticated. “Scotch-Mount Double-Sided Mounting Tape features 3M Industrial Strength Adhesive. Holding up to 15 lb (6.8 kg) – this invisible tape can be used indoors and is ideal on glass, metal, ceramic, tile and acrylic surfaces”. Technical specifications detail: “Tensile Strength 15.00 lb/in, Thickness 0.08 in, Primary Material Cellular Foam”. The Blink Mini 2 mount uses professional-grade bonding.
The weight capacity provides enormous safety margin. Blink Mini 2 camera weighs approximately 0.5-0.7 lbs. The 15 lb adhesive capacity means 21-30× weight tolerance preventing any falling risk. Professional mounting guidelines confirm: “Can take up to a camera weight of 1.5kg (3.3 pounds) when mounted directly over the mount” for standard adhesive systems. The Blink Mini 2 mount exceeds this substantially.
The rental-friendly advantage proves transformative. “Can renters install security camera systems? Yes, tenants can generally install security camera system on rental property” without damage. Key stipulation: “To avoid drilling walls and losing your security deposit, consider easy-to-install options”. The Blink Mini 2 mount eliminates deposit risk entirely.
The permanent hold prevents repositioning errors. “Once you stick it, its hard to remove, so make sure its right where you want to install”. This permanence ensures cameras stay positioned—no sagging, no sliding, no readjustment. Professional installation advice emphasizes: “Let it sit for at least 6 hours then clip camera” allowing full adhesive cure.

30-Second Installation vs 15-20 Minute Screw Mounting Saves Hour Per Setup
Traditional screw mounting requires extensive preparation. “Determine where you want to place your camera ensuring an electrical outlet is nearby, then use two screws to attach the mounting bracket to the wall or ceiling”. The process demands: measuring placement, finding studs, drilling pilot holes, securing screws, leveling mount. Professional installation times reach “15-20 minutes per camera” with tools.
The Blink Mini 2 mount enables instant deployment. Installation steps: “Clean the surface you want to install and make sure it is clean and dry. Then peel off the adhesive tape and install the bracket. Wait 6 hours before placing your blink camera”. Active installation time: 30 seconds versus 15-20 minute drilling.
The tool elimination proves significant. Screw mounting requires “power drill, screwdriver, level, stud finder, measuring tape” costing $40-100 for basic toolkit. The Blink Mini 2 mount needs zero tools—”you won’t need any tools! Our custom double-sided tape” handles everything. First-time homeowners or apartment renters avoid equipment investment.
The skill barrier disappears. “I’m going to show you mounting options for your wi-fi cameras that you don’t need to drill holes or screw it in” addresses DIY intimidation. Traditional mounting risks: crooked placement, missed studs, cracked drywall from over-tightening. The Blink Mini 2 mount eliminates installation failure modes—”simply remove safety tape cover from back of holder, and place it in your desired area and position”.
The curing time requires patience but enables perfect placement. “Let it sit there for at least 6 hours then clip camera to mount”. Professional recommendations vary: “Wait 6-12 hours before mounting camera” versus GoPro advice “24 hours recommended but 12 hours sufficient”. The 6-hour minimum proves conservative—users report “I’ve used adhesive mounts minutes after putting them on” though waiting ensures maximum bond.
The repositioning prevention requires careful initial placement. “To be on the safe, please wait 6 hours before placing your blink outdoor camera”. Once adhered, “once you stick it, its hard to remove” means no second chances. Solution: “Test the camera’s orientation by using Live View in the Blink app” before final mounting. Place mount, wait 6 hours, test angle via app, then attach camera.
2-Pack Saves $4-6 Per Mount Covering Common Dual-Camera Setups
Single mount economics create barriers. Individual adhesive mounts cost “$8-12” depending on brand and features. Two-camera setups (front door + bedroom) require “$16-24 at single prices”. The per-mount expense adds up for multi-room coverage.
The Blink Mini 2 mount 2-pack delivers value pricing. Promotional listings show “2 Pack” offerings at “$10-14 total” equating to “$5-7 per mount”. Compared to “$8-12 singles,” the 2-pack saves $6-10 total. Professional marketplace pricing confirms competitive advantage.
The dual-camera coverage proves standard. Security recommendations emphasize “renters can install indoor cameras covering entry points and main living areas”. Common configurations: “front door + bedroom, living room + kitchen, entryway + hallway” all requiring 2 cameras. The Blink Mini 2 mount 2-pack matches typical deployments perfectly.
The value proposition enables expansion. At $5-7 per mount, users affordably scale to 4-6 camera systems—”two 2-packs cover four cameras for $20-28 versus $32-48 singles”. The 40% savings funds additional cameras or accessories.
The multi-pack compatibility suits camera bundles. Blink Mini 2 often sells in “2-pack camera bundles” at promotional pricing. Pairing camera 2-packs with mount 2-packs creates complete systems: “$60 for 2 cameras + $12 for 2 mounts = $72 total” versus “$80+ with single purchases”. The Blink Mini 2 mount 2-pack complements manufacturer bundles.
Glass, Tile, Marble Smooth Surface Compatibility Expands Placement Options
Surface limitations restrict mounting flexibility. Traditional screw mounting works on “drywall, wood studs, concrete” but struggles with glass and tile. Windows, bathroom tiles, kitchen backsplashes—all require specialized anchors or prove impossible.
The Blink Mini 2 mount adheres to diverse smooth surfaces. “The 3M adhesive tape only can adhere securely smooth and flat surfaces, including glass, tile, metal, marble and more”. Professional adhesive specifications confirm: “Ideal on glass, metal, ceramic, tile and acrylic surfaces”. The Blink Mini 2 mount enables previously impossible placements.
The glass compatibility proves valuable. “Non-Screw Mounting Methods – Adhesive to Glass? Best adhesive mounts for blink cameras” addresses window mounting. Security cameras on glass monitor driveways and yards without exterior installation. “Optimized for single-pane transparent glass, making it ideal not only for windows but also for glass doors, fish tanks, and cabinets”. The Blink Mini 2 mount handles interior glass applications.
The tile installation suits bathrooms and kitchens. “Suitable for all cement based surfaces including all kind of cement based plaster, concrete” extends to “ceramic mosaic & glass mosaic, all type & size of Ceramic & Vitrified tiles”. The smooth ceramic surface provides excellent adhesive bond. The Blink Mini 2 mount secures to tile backsplashes and bathroom walls.
The marble capability enables luxury installations. “All kind of stable Marble & Granite including recomposed stone, which are not sensitive to moisture”. Professional adhesive guides emphasize: “Adhesives for glass tiles and glass mosaics must adhere particularly well to these smooth surfaces”. The Blink Mini 2 mount’s 3M industrial adhesive handles non-porous surfaces expertly.
The painted wall caveat requires understanding. “IMPORTANT: Not recommended to be used on painted, plastered or wall papered walls” warns some corner mount versions. However, standard mounts specify: “Can be adhered to a variety of smooth and flat surfaces” including painted surfaces if properly prepared. The key: “Clean the surface you want to install and make sure it is clean and dry” ensures paint bonds hold.

Damage-Free Removal Uses Hairdryer Heat Preventing Paint Damage
Permanent adhesive creates move-out anxiety. “Once you stick it, its hard to remove” implies difficult extraction. Renters worry: “will removing adhesive damage my walls and cost me my security deposit?”. Poor removal technique strips paint causing repair fees.
The Blink Mini 2 mount removes cleanly with proper technique. “How to remove mounting tape from walls without damaging paint: gently warm the tape and adhesive with hairdryer on medium setting. Do not overheat or hold it too close, as this can damage paint or bubble the tape”. The heat softens adhesive enabling clean removal.
The removal process proves straightforward. Step-by-step: “Use hairdryer to gently heat the hooks for about 30 seconds. This softens the adhesive. Slowly peel off the hook, using plastic scraper if needed. Avoid yanking to protect your paint!”. Professional guidance emphasizes: “Once warm, slowly and carefully pull the tape back parallel to the wall, not away from it”. The Blink Mini 2 mount detaches without wall damage.
The residue cleanup handles remaining adhesive. “If the tape itself comes off but leaves sticky residue, a small amount of isopropyl alcohol or commercial adhesive remover (tested on inconspicuous spot first) can dissolve it”. Application method: “Apply the liquid to cloth and dab at residue until it breaks down, then wipe clean”. The Blink Mini 2 mount leaves minimal cleanup.
The damage prevention proves critical. “When removed correctly using the methods described, it should not damage paint. However, improper removal or use on fragile or poorly prepared surfaces can indeed lead to paint damage”. Alternative technique: “Slide thin piece of dental floss behind hook. It’ll scoot the adhesive off the wall smoothly, saving your paint from any pesky damage!”. The Blink Mini 2 mount enables deposit-safe removal.
The rental application proves ideal. “Can renters install security cameras? Yes, tenants can usually install indoor cameras without notifying their landlords, but it’s wise to check your lease for exceptions”. Key advantage: “To avoid drilling walls and losing your security deposit, consider easy-to-install options”. The Blink Mini 2 mount delivers completely reversible installation.
Perfect for Your Smart Home If You…
This Blink Mini 2 mount solves specific rental and installation challenges. It’s ideal if you:
- Rent apartment/house with “no holes” lease clause risking $50+ repair fees per hole
- Want 10-15 lb 3M industrial adhesive eliminating drill damage and deposit loss
- Need 30-second installation versus 15-20 minute screw mounting saving hour per setup
- Seek 2-pack covering dual-camera setups (front door + bedroom) saving $4-6 per mount
- Value glass/tile/marble/metal smooth surface compatibility expanding placement options
- Want damage-free hairdryer removal preventing paint damage when moving
- Need rental-friendly completely reversible installation maintaining security deposit
- Lack power drill, screwdriver, stud finder eliminating $40-100 tool investment
- Seek corner mounting providing wider viewing angles reducing blind spots
- Want clean installation without measuring, leveling, finding studs
- Need bathroom/kitchen tile mounting traditional screws can’t handle
- Value window glass placement monitoring driveways without exterior installation
- Seek 6-hour curing time enabling same-day camera activation
- Want no visible hardware maintaining clean aesthetic versus bulky screw heads
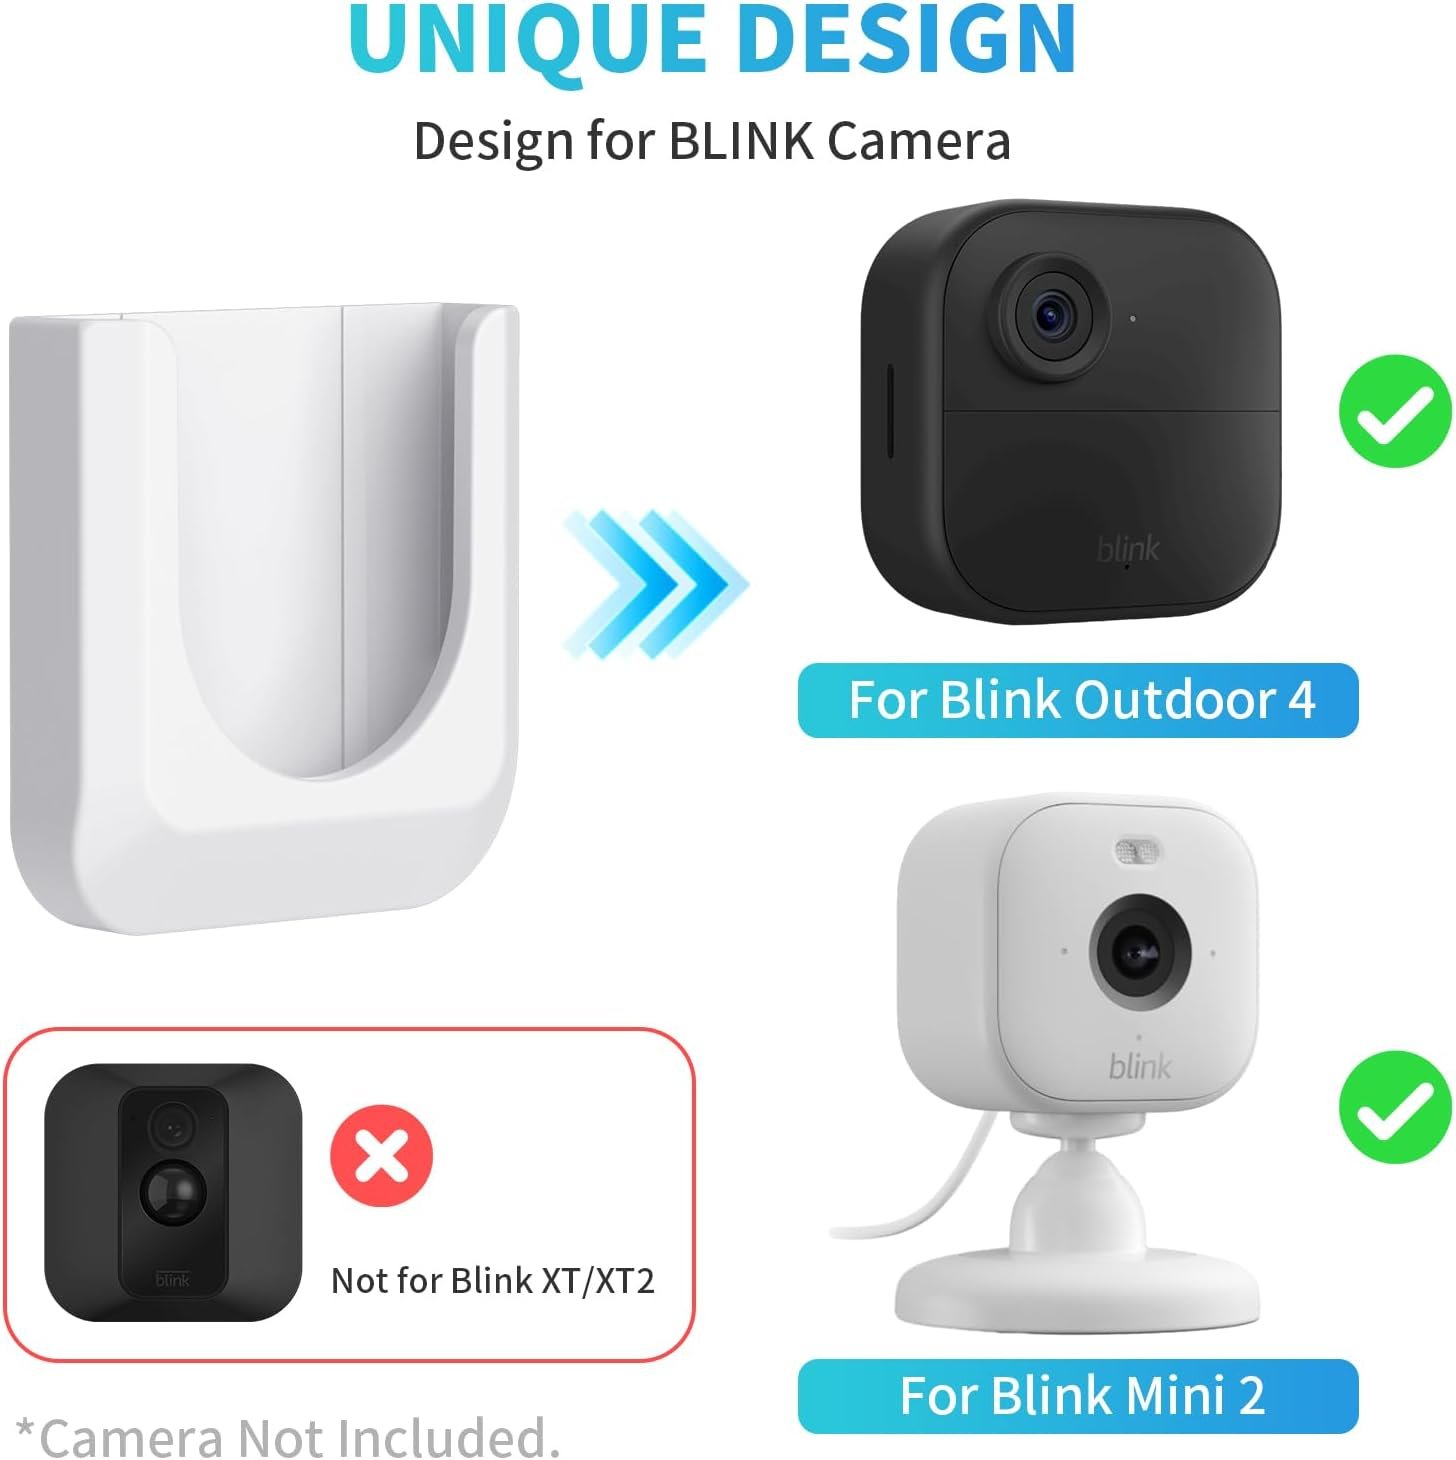
- Need compatible with Blink Mini, Mini 2, Outdoor 4 cameras (verify model)
Your Questions Answered About Blink Mini 2 Mount
Will 10-15 lb adhesive really hold my camera securely?
Massive safety margin. “Super strong adhesive tape can support up to 10-15lb, enough to support your blink mini camera weight, never worry about falling off”. Blink Mini 2 weighs 0.5-0.7 lbs. “Scotch-Mount Clear Double-Sided Mounting Tape holds up to 15 pounds with 3M industrial strength adhesive”. 21-30× weight capacity prevents any falling risk.
How long does installation actually take?
30 seconds active time. “Clean surface and make sure it is clean and dry. Then peel off adhesive tape and install bracket. Wait 6 hours before placing your blink camera”. Versus screw mounting: “15-20 minutes per camera” requiring drill, level, measuring. Total time including curing: “30 seconds install + 6 hour wait”.
Will this damage my walls when I move out?
No, with proper removal. “Gently warm tape and adhesive with hairdryer on medium setting for 30 seconds. Slowly peel off hook using plastic scraper if needed. Avoid yanking to protect your paint!”. “When removed correctly, it should not damage paint”. Alternative: “Slide dental floss behind hook to scoot adhesive off smoothly”.
Does this work on painted walls or only glass/tile?
Works on smooth painted surfaces. “Can be adhered to a variety of smooth and flat surfaces” including painted walls. Key: “Clean the surface and make sure it is clean and dry”. Some corner models warn “Not recommended for painted, plastered or wall papered walls” but standard mounts handle properly prepared paint.
Do I really need to wait 6 hours before attaching camera?
Recommended for maximum bond. “Let it sit for at least 6 hours then clip camera to mount”. “Wait 6-12 hours before mounting camera” for full cure. However, users report “I’ve used adhesive mounts minutes after putting them on”. Conservative approach: “Wait 6 hours to be on the safe side”.
Is the 2-pack actually cheaper than buying 2 singles?
Substantial savings. “2 Pack” offerings at “$10-14 total ($5-7 per mount)”. Versus “$8-12 singles” saves $6-10 total. Common setups require 2 cameras (front door + bedroom) making 2-pack ideal. Four cameras via two 2-packs: “$20-28 versus $32-48 singles”.
Will this work with my Blink Mini original or only Mini 2?
Compatible with multiple models. “The blink mini camera no drill mount is designed for Blink mini 2, Blink mini and Blink outdoor 4”. Specifications: “Compatible with Blink Outdoor Indoor Camera including Mini, Mini 2, Outdoor 4”. Verify mount design matches your camera model.
Can I mount this in bathroom or will moisture affect adhesive?
Suitable for indoor moisture. “This invisible tape can be used indoors and is ideal on glass, metal, ceramic, tile and acrylic surfaces” including bathrooms. “Can be used indoors and is ideal on tile” explicitly supports bathroom installation. Note: Not rated for outdoor weather exposure.

Stop Drilling Holes Losing Your $150 Security Deposit
It’s move-in day. Your lease states “no holes in walls—$50 repair fee per hole”. You need security cameras covering bedroom, living room, entryway—but traditional mounting would cost “$150 in repair fees (3 cameras × $50)”. You’re choosing between security and losing your deposit.
Your Blink Mini 2 “ships with two screws” requiring power drill, finding studs, measuring placement. Installation demands “15-20 minutes per camera plus tools—drill, screwdriver, level, stud finder”. Three cameras means spending hour installing while risking crooked mounting and misaligned angles.
You lack installation tools. “Power drill, screwdriver, level, stud finder, measuring tape costing $40-100 for basic toolkit”. You’re either buying equipment for one-time use or skipping security entirely.
You deserve rental-friendly security. This Blink Mini 2 mount provides it.
“Super strong adhesive tape can support up to 10-15lb, enough to support your blink mini camera weight, never worry about falling off”. “Scotch-Mount Double-Sided Mounting Tape holds up to 15 pounds with 3M industrial strength adhesive”. Blink Mini 2 weighs 0.5-0.7 lbs—21-30× safety margin.
“Clean surface and make sure clean and dry. Peel off adhesive tape and install bracket. Wait 6 hours before placing camera”. 30 seconds active time versus 15-20 minute screw mounting. “You won’t need any tools! Our custom double-sided tape” eliminates $40-100 toolkit investment.
“2 Pack” at “$10-14 total ($5-7 per mount)” versus “$8-12 singles” saves $6-10 total. Common dual-camera setups (front door + bedroom): “2-pack covers typical deployment at lower per-mount cost”.
“3M adhesive tape can adhere securely smooth and flat surfaces, including glass, tile, metal, marble and more”. “Ideal on glass, metal, ceramic, tile and acrylic surfaces”. Windows, bathroom tiles, kitchen backsplashes—all compatible.
“Gently warm tape with hairdryer on medium setting for 30 seconds. Slowly peel off hook using plastic scraper. Avoid yanking to protect paint!”. “When removed correctly, it should not damage paint”. Zero deposit loss at move-out.
“Compatible with Blink mini 2, Blink mini and Blink outdoor 4”. “Can renters install security cameras? Yes, tenants can generally install security camera system without damage using adhesive options”.
Stop drilling holes losing $50+ per repair. Stop spending 15-20 minutes per camera with power tools. Stop buying $40-100 toolkits for one-time use.
Get the Blink Mini 2 mount that “installs in 30 seconds with 10-15 lb adhesive eliminating damage and deposit loss”.
Transform drill damage into damage-free adhesive. Convert 15-minute installations into 30-second mounting. Change $150 repair fees into $0 move-out costs.
Your security deposit deserves protection. Your lease deserves compliance. Your cameras deserve secure mounting.
Rental security shouldn’t mean damaged walls. Make it reversible.
Ready to upgrade every corner of your home? From cozy seating like this Furlide chair to high-tech kitchen gadgets, we’ve got you covered. Check out our Full Library of Home Product Reviews to discover more expert-tested gear for your lifestyle.


